Friday, October 14, 2016

Preparing the Soil for Winter

It's hard to believe that winter is just around the corner! Your garden needs special care at this time of year so that it will be ready to flourish again the spring.


Here's what you need to do to prepare your garden for winter, according to a publication from Virginia Tech:


  • Pull up any dead plants, especially annual vegetables like tomatoes, peppers, etc. that are finished for the season. Leaving dead plants in the garden provides a safe haven for damaging insects and disease organisms. 
  • Discard diseased plants in the trash. Do not compost them. This can spread disease organisms back into the soil.
  • Work compost into the soil after you finish your garden clean up.
  • Raking leaves? Add them to your compost pile!
  • Cover crops decrease erosion and help retain moisture in the soil. Good cover crops are mixtures of legumes. In the spring, till the cover crop into the soil for added nutrients.
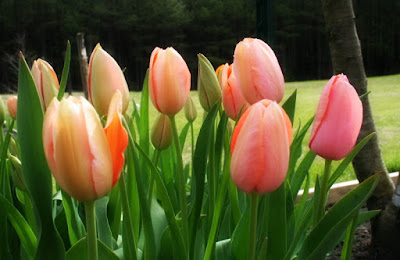
  • Think spring! Finish planting tulips, daffodils, crocus and other spring-blooming bulbs in the fall. You can continue planting them until the ground can no longer be worked.

It is also a good idea to drain hoses, fountains, and bird baths, and put them inside for the winter. Terracotta and stone pots should also be stored in a dry place. Water can seep into the porous surface, freeze, and crack, causing damage.

Lastly, don't forget to service your lawn mower and gardening tools such as edgers and trimmers according to the manufacturer's directions. 


Photo credit: (c) Jeanne Grunert. 


Friday, September 16, 2016

Cold Frame Gardening Can Extend the Season

The weather still feels like summer sunshine, but fall's frosts will be here soon. For vegetable gardeners, fall is bittersweet. On the one hand, fall's frosts make broccoli and Brussels sprouts extra sweet and tasty. You can grow lettuce well into the fall. But on the other hand, it's the end of tomato season. So as with everything in life, it's trade off.

One thing you don't have to trade off in the fall and winter is your love of vegetable gardening. If you're passionate about growing veggies at home, a cold frame, row tunnel or homemade hothouse can keep the garden just warm enough to grow many cold-tolerant vegetables well into the winter.


Image used under Morguefile.com license/(c) Nicola Avery


What Is a Cold Frame?

Purdue's Cooperative Extension defines cold frames and hot beds as a frame that provides protection for growing crops. The difference between the two is in the source of heat. Cold frames derive heat from sunlight only, while hot beds remain warm from a combination of sunlight and another source. Old-time farmers used to line hot beds with fresh manure; the heat from decomposing animal manure kept the temperatures slightly warmer and supplemented the sunlight.

Today, most gardeners choose a cold frame as their method of choice for growing crops into the wintertime. A frame can be built using the wall of your house as the fourth wall. Make sure it is on a warm, sunny side of the house - southern exposures are ideal. The more sunlight, the better.

Purdue recommends fashioning the cold frame into two sections with a hinged lid so that one side can be ventilated or closed, as the need arises. Two sides separated by a dividing wall also gives you enough space to grow seedlings on one side and mature crops on the other. As the crops mature and fade, you can pull them out and plant your seedlings, reversing the sides.

Full construction details, including a little plan with measurements, is available from the Purdue Cooperative Extension. For many vegetable gardeners, building a cold frame is an ideal way to extend the season and continue putting fresh vegetables on the table well past the new year. Plan your building project now!

Friday, August 19, 2016

Choosing Tulip Bulbs for Your Garden


Tulips may be a sign of spring, but they are actually planted in the fall in anticipation of spring. The bulbs require several weeks of chilly weather in order to grow and bloom. Now is the best time to shop for tulip bulbs. The local nursery and garden centers have the best selection, and you can take your time picking the best of the bunch for your garden.

Tulip bulbs actually hail from Turkey and cooler Asian climates. Traders brought them to Holland, where they seemed to flourish in the cool, moist climate. By around 1637, tulips were all the rage, with new colors like the "Rembrandt" striped and striated flowers causing a run on the market, with prices soaring in a short while. Fortunes were made and lost as speculators bid their wealth on the precious bulbs. Sound familiar? People never change!

Today, we are fortunate to live in an era when hybridizers and growers have selected the best among each of the categories of tulips and bred them for specific characteristics such as color, resistance to wind and weather, repeat blooming and so on.

Most tulips should be treated as annual flowers, or at best, short-lived perennials. Although I have some Darwin hybrids (above) that return in the garden, with each year they do diminish, and eventually the flowers are much smaller than in their original years. The plant puts energy into the bulb to reproduce, and eventually, unless you dig up the bulbs, split them, and lovingly tend them for a few years, they won't bloom again.

Gardeners, myself included, rarely have the time, patience or space for this, so I simply plant more and enjoy the show.


If you're interested in naturalizing with tulips, or finding tulips that might return for repeat blooms, choose from among the Tulipa kaufmaniana, Tulipa fosteriana, and Tulipa gregii hybrids. Like species tulips, these tend to bloom earlier and are less showy than the cottage, Darwin, parrot and lily-flowered tulips that add so much variety to the garden.

As you shop for your tulip bulbs, read the package label. Consider the estimated blooming times, and add a few species that bloom as early as March and as late as May so that you have a continual show in the garden. You can plant different species in the same planting hole. The tulips don't mind.

Choose the biggest bulbs you can find. The larger the bulb, the bigger the flower - or at least that is what a Dutch bulb grower once told me when I worked in a garden center! And after your tulips are finished blooming in the spring, let the leaves die back naturally. Don't cut them back or hack them down to the ground. The leaves are the food factories of the plant. Through the process of photosynthesis, they produce carbohydrates in the leaf cells which act as nourishment for the plant. Cut the leaves off of the plant and it dies.

Lastly, as you're planting tulip bulbs, remember to plant them with the pointy-side up, like a Hershey's chocolate kiss. Dig the hole as deeply as the package directions tell you to do, for the plant needs it, and the deeper holes discourage squirrels from digging the bulbs up entirely. Make sure you place a plant label or a marker on the spot so that you remember what you've planted there. It's easy to forget during the long winter months and dig up your precious bulbs in your haste to plant spring annuals later.

Although I don't think we'll see "Tulipamania" the way the Dutch did during the Dutch Golden Era, I sometimes feel a kinship with the burgermeisters of times past who gambled fortunes on flower bulbs. As I empty my wallet on the store counter, packing bag after bag of tulips away as if they were treasures of gold, I understand how one humble flower could inspire a mania. I share the passion!

RESOURCES for Your Enjoyment


Friday, August 12, 2016

Hydrangea Care


I love hydrangea. This praying mantis in my garden seems to love them, too. But I find it challenging to grow hydrangea here in south central Virginia. Too much heat, not enough rain...sometimes they seem fussier than roses.

For those looking for a quick primer on hydrangea care, I've included tips derived from a great Cooperative Extension publication. Virginia Tech offers a free download called Hydrangea Selection, Pruning and Care that was very helpful to me as I struggled to figure out why the leaves on my hydrangea are turning black (probably over-eagerness to fertilize on my part) and why the color changed on one plant. It's definitely worth downloading if you love hydrangeas.

A few notes on hydrangea care from our friends over at Virginia Tech: (These tips apply to Big Leaf Hydrangea, which is what you normally see blooming in people's front yards at this time of year or so.)

  • No flowers? Don't prune your shrubs late in the season. Hydrangeas bloom on last year's woody stems. Prune older stems in late June or early July and don't prune too much away. You can also prune in late winter if you missed your opportunity in the summertime.
  • You can influence the color of the blossoms by changing the soil pH. A drench with an aluminum sulfate mixture (see the link above) changes the color to blue. Hydrated lime mixed with water changes it to pink. Please be sure to read the Virginia Teach pamphlet for the correct proportions of solution to water.
  • Hydrangea thrive in rich, moist and well-drained soil. If they are struggling, have your soil checked. It could be too dense to allow for drainage. Our local clay soils may need amendments before hydrangea find them acceptable.
Hydrangea are beautiful landscape plants and a treasure in the garden. Here's to a beautiful bloom this year and more!


Friday, August 5, 2016

Cracks in Tomatoes

There's nothing quite like the taste of a fresh garden tomato. I love growing tomatoes, and am still learning the best ways of growing them. Virginia Tech has a great free tip sheet on growing tomatoes that can help beginners improve their cultural practices and grow gorgeous tomatoes all summer long.


Let's talk about one problem that I'm seeing frequently in my garden this year: cracks, specifically cracks that radiate longitudinally from the stem of the tomato and radiate down into the fruit. These are called growth cracks, and they can be common among large, beefsteak varieties of tomatoes.

According to the Cooperative Extension, these cracks appear when environmental conditions cause rapid growth of the tomato. A drought, followed by a heavy downpour, is an example of natural conditions that can cause these cracks.

Think of it this way: a tomato's skin is like a plastic grocery bag. If you fill a grocery bag too full of cans or boxes, cracks appear and the bag breaks. It can only expand so far to fit your purchases inside. A tomato is like that. The exterior skin can only grow so fast, but when a rush of water hits the garden, the greedy roots drink deeply, pushing water to the growing tomatoes. The skin can't expand fast enough, so what does it do? It cracks.

You can prevent growth cracks to some extent by watering your plants on a regular basis. Of course, you can't control nature. A downpour after a thunderstorm, a welcome rain storm after a drought - that's life in Virginia in the summertime. Into every life a little rain must fall.

Tomatoes with cracks are fine to eat. Just cut away the cracked part, and keep an eye on the area where the cracks appear. Microorganisms can enter and start rot, which of course ruins the tomato.

But in the meantime, you can still enjoy those fine summer tomatoes. Rain or shine, nothing beats a fresh garden tomato on a hot August day.

Monday, July 11, 2016

Tips for Growing and Containing Mint

Growing mint in the home garden is a delicate dance between desire and frustration, delight and horror. Plants in the mint (Lamiaceaefamily are tough as nails, and seemingly driven to conquer the world. Here's how to contain mint before it contains the rest of your garden to one small square foot.


The mint family includes popular favorites such as spearmint, apple mint, peppermint, and many, many other types of mint. Mint is so prolific, and crosses easily with others in the mint family, that different mints planted within your garden can actually mingle their genes and produce unique and distinct offspring. That explains why a dear friend of mine, who lamented leaving his exceptionally pungent patch of mint behind in New Jersey when he moved to Virginia, was right when he said he could never find the exact same scent in mint plants here. It's possible he had a unique hybrid right in his yard, or one of the dozens available on the commercial market that may not have made it to our local garden centers.

Mint spreads mostly by runners, however, and not by seeds, and it will spread, far and wide. In fact, mint can even tunnel under fences, barriers, and other things you put in its way.

Experts at the Cooperative Extension recommend that if you wish to keep your mint contained, you container it - that is, you plant it in a container. You can sink the container into the soil to grow it in your garden without it spreading throughout and swallowing everything in its path.

Mint loves full sunshine, but can survive in partial shade. They tolerate a wide range of soil types and can survive drought. Pinch leaves or snip them off and dry them for use in teas and other cooking projects later in the year. Don't worry about over-harvesting your mint. It laughs in the face of adversity.

If you do find your mint patch taking over the yard, you may need to pull it out and pot up just enough to tide you over. Any little bit of stem or root left in the ground will find a way to grow again. (Ask me how I know). Be careful, thorough, and resigned to the fact that you may need to repeat the process of digging it up for several seasons until it gets the hint that it's no longer wanted.

Mint is easy to grow but can be a pest. If you love it, however, nothing beats the scent of freshly crushed mint leaves rolled between your fingers. To me, it's the scent of summer.

Friday, June 17, 2016

Tips to Keep Pests - and Pesticides - Out of the Garden

Attract beneficial insects.


Virginia Cooperative Extension recently published a great article called "Tips to Keep Pests - and Pesticides - Out of the Garden."  The Extension office recommends seven methods of insect control in the vegetable and ornamental garden that do not use pesticides. Instead, they rely on simple, common sense organic gardening techniques that can work very well in the home garden.

Among the advice offered in the article, the Extension Office recommends:


  • Removing many insect pests by hand: A simple method to remove pests like the Colorado potato beetle and cucumber beetle larvae uses soapy water to drown them. Simply use a clean glass jar with a lid, like a spaghetti sauce jar that you're going to put into the recycling bin anyway. Place one tablespoon of liquid dish washing soap in the bottom and add water until the jar is one-quarter to halfway full. Then, put on a pair of rubber gloves or gardening gloves and pick the bugs off, one by one, dropping them into the soap water. The soap makes it impossible for them to climb out. Close the lid when you're finished insect removal and place the entire jar in the trash.
You can remove insects by hand instead of using pesticides.

  • Using aluminum foil "collars" around seedlings to prevent cutworms: I never thought of using aluminum foil, but instead use newspaper or paper collars. Fold a strip of paper to make a thick collar, tape it shut, and place it around seedlings to act as a barrier for the cutworm. You can also cut a paper cup in half and use the open ring of paper as a cutworm collar.
Cutworm collars can be made from recycled materials. These are made from PVC pipe scraps. You can also use aluminum foil, newspaper or paper cups.

  • Attract beneficial insects: Planting flowers around your vegetable garden not only attracts pollinators, it increases the number of beneficial insects in the garden, too. Predatory wasps can take care of tomato hornworms. Ladybugs will gobble up mites. A variety of flowers, herbs and vegetables offers a feast for insects of all types, but especially beneficials who will help keep the harmful insects in check.

Herbs like these chives planted among other vegetables attract beneficial insects.


For more tips, please see: 7 Tips to Keep Pests - and Pesticides - Out of the Garden from the Virginia Cooperative Extension.

Friday, June 10, 2016

Get Ready for Japanese Beetle Season

June is the season for roses, for the end of fresh garden lettuce and peas, and the start of tomato season. It's also the start of Japanese beetle season here in Virginia. Here are some recommendations from the Virginia Cooperative Extension on how to handle this pest.

Japanese Beetle Identification

First, know your enemy: Japanese beetles emerge sometime in the south central Virginia area around Father's Day. Some years it's a little before, some years, a little later. The brown beetles have an iridescent sheen to the carapace, or shell. 

The beetles don't migrate, but actually spend the entire year going through their larval and pupal stages in the earth. Around May, the larvae begin to wriggle to the surface. The fat grubs can often be found when digging in the soil, especially lawn areas where the adult beetles like to lay their eggs.

Japanese Beetle Damage

The larvae damage lawns by eating the roots. This turns the grass above brown, often in patches around where the insects are feeding. Adult Japanese beetles land on the leaves of many ornamental plants and eat holes through the leaves, creating a lace-like effect. They love roses, morning glories, and many, many other plants.
Image licensed from Shaka, Morguefile.com license

Good News and Bad News

The good news with Japanese beetle control is that a drought in July and/or August will kill off many of the eggs, thus reducing the population of beetles the following year. I say that's good news because we often get long dry spells at that time of year, which benefit us in terms of insect control.

Another bit of good news when it comes to Japanese beetle control is that the grubs or larval form of the insect are easier to control than the adults. Lawn-care products that promise to reduce or kill Japanese beetles are your best defense.

Natural Japanese beetle control includes Nematodes, specifically entomophagous nematodes, which are said by the Virginia Cooperative Extension to be effective in controlling the grubs.

Now here's the bad news: one the insects reach the adult form, they are difficult to control. Please see the Virginia Cooperative Extension website for detailed information on insecticides to control the adult beetles.

Can You Use Japanese Beetle Lures and Traps?

Nothing seems to generate more controversy than those ubiquitous bag traps you see hanging in people's yards. The traps work using scent lures and a bag. The scents mimic Japanese beetle pheromones or sex scents. When the beetles smell the come-hither scent, they fly to the trap, tumble into the bag, and can't get out. Every few days or weeks, you remove the bags and throw them in the trash, replacing them with fresh bags until the beetle onslaught has abated.

Some gardeners will swear that the traps work wonders. Others swear AT you when you hang up the traps, claiming you've just wasted your money and they don't work. Who is right? We have to go with the Virginia Cooperative Extension on this one. They claim that the traps work to some extent, but can attract more beetles into the area. That makes a lot of sense. After all, the goal of the scent lures is to attract beetles so it stands to reason that a trap may indeed lure more into your yard.

Whether you use the hanging traps or not is your choice, but given the few effective treatments against this invasive pest, a combination of larvae control, traps and planting resistant-species may help.

For more information on Japanese beetle control, please see:


Friday, May 27, 2016

Easy Care Plants: Succulents

Looking for an easy-care plant? Try succulents. These low-water use plants can tolerate a range of conditions and are virtually pest-free.


Sedums, like the ones shown above, are just one of many plants in the succulent family. They're characterized by thick, fleshy leaves that hold moisture. Unlike cacti, succulents do not have thorns. They evolved in arid (desert) regions of the world and like hot, dry conditions. Sounds familiar? Sounds like Virginia in the summer!

Because they can tolerate a wide range of conditions, succulents are ideal for those areas in your yard or garden that get hot sunlight. Sedums and other succulents do well in rock gardens where shallow soil is often the norm, and they also do well in pots and containers.

There are so many varieties of succulents available at your favorite nursery and garden center that it would be difficult to list them all. Choose one to add to your garden, find a sunny spot with dry conditions, and you've got the makings of a lovely succulent garden.

Native Stonecrop (Sedum ternatum)
One stonecrop native to Virginia is Sedum ternatum. This succulent actually prefers woodlands, where it grows in the quiet shade underneath trees. White flowers adorn the upright stems when the plant blooms in May or June. It's a lovely stonecrop that's worth investigating for your native plant garden.


Friday, May 20, 2016

Benefits of Native Plants

Cardinal flowers in the garden.


You may have heard the term "native plants." What is a native plant? It's a plant that's indigenous to the area in which you live. It evolved alongside other plants, animals, insects, birds and organisms in the local area. Because of this, it serves a unique purpose in the ecosystem. Many native plants, for example, provide food for local song birds, butterflies, insects and other wildlife, or provide nesting or hatching sites for others.

Native plants are also great for the garden. Because natives evolved in the local climate, they aren't as fussy about things as imported plants. Most natives come with a long list of wonderful attributes include natural disease resistance, less need for supplemental fertilizer and water than other plants, and more. Not only are they great to grow, but they're beautiful, too!

Anytime you can incorporate native plants into your garden, you're doing both your garden and the local environment a favor. Many animals, insects and birds are losing their natural habitat to development. Roads, parking lots, strip malls, houses...everywhere you see these signs of modern life, that's a little less ground available for native plants to live.

People have always brought plants with them wherever they went in this big world of ours. When the colonists came over from Europe, they took daylily tubers in their packs along with them. And while the ubiquitous ditch lily isn't harmful, some non-native species become invasive species if given the right conditions. Kudzu, anyone? Introduced as an ornamental vine, kudzu quickly became "the vine that ate the south" as it smothered entire fields and forests under its relentless march, all because someone thought it a good idea to import it into an environment in which it has no natural predators.

Nature has a unique way of making checks and balances part of her grand scheme throughout all aspects of life, plants include. Native plants have their own system of checks and balances in place so that they don't get out of hand. If you're looking for terrific native plants, look no further than your local nursery and garden center, which probably stocks some terrific natives now.

For lists of native plants to include in your ornamental plantings this year, see:


Friday, May 6, 2016

The Eastern Tent Caterpillar

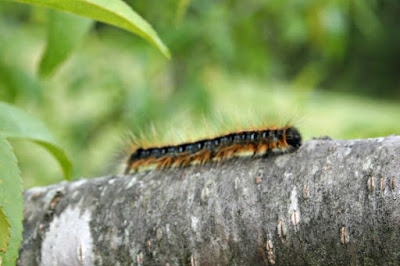
Have you spotted this guy? He should be among America's Most Wanted. It's the Eastern tent caterpillar, or Malacosoma americanum. My entire garden is overrun with them. Here's how to control the Eastern tent caterpillar.


That's him. Sneaky little insect. This spring, we noticed the start of what turned out to be quite a swarm among our fruit trees. Normally, we see the sticky tents, or webs, of the tent caterpillar on the wild cherry trees along the forests and roads here in Prince Edward county. But I have never seen them marching across lawns, over piles of construction materials, and even into my garage!

The tent caterpillar is a native insect found throughout the entire Eastern region of the United States. It is most obvious when it's in the sticky tent, or web, that you're probably familiar with in the crotch of trees or on the forked branches of your favorite cherry tree.

The female moth lays a cluster of small, shiny black eggs in the fall or early spring. The young quickly hatch into larvae, and the larvae or caterpillars spin a sticky web around them. They cluster together in the middle for protection.

Three or four times a day, the young emerge from their nice snug little nest to feed on the leaves of the host tree. They can strip the tree of all of its leaves before they're done. It doesn't kill the trees outright, but it does stress them considerably, as you can imagine. The tree must grow an entire new set of leaves.

"Hello, there! Thanks for the peach tree leaves! They were delicious!"


The young expand their sack or tent until they are ready to pupate, or turn into moths. They emerge fro the sack and begin their migration. That's what I am seeing now all over my yard. The swarms of tent caterpillars are simply individuals looking for a nice spot to spin a cocoon and emerge in a few weeks, moths ready to fly away and continue the cycle.

I don't know if any other parts of Virginia or areas served by the Heart of Virginia Master Gardeners are also seeing a surge in tent caterpillars. According to the Cooperative Extension website, there's a natural fluctuation from year to year in the population.

Natural predators include birds and predatory wasps, and in a quiet year, that's who keeps them in check. Some years, like this one, we just seem to have more.

To control tent caterpillars, you've got to be brave. Put on a pair of rubber gloves -- the kind you use to keep your hands clean while you scrub the toilet. You know the kind I'm talking about. Then grab a pail or bucket. Pick off the caterpillars and drop them into your bucket. The "squish" method works well. You can also use a trowel to chop them in half or squish them on the tree. It's gross, I know, but the most effective way to get rid of them while they are out of the tent.

If they're in the tent, take a garden rake or hoe and use it to reach into the branches of the trees to remove the nest or tent.

Sprays, according to the University of Kentucky and Missouri websites, have little effect upon these critters (lucky them.) If you'd like to learn more about what sprays do work, please review the information on their websites:


Friday, April 15, 2016

Planting Annuals in April

The garden centers are chock full of beautiful flats of annual flowering plants. Impatiens, petunias, begonias...it's a feast for the senses after a long winter's wait, isn't it? But the waiting isn't over...


The other day, I happened to stop by the garden center just at the right moment...the discount moment. You know what I mean. That magical day, time and place when the stars align and the plants not just 50% off, but 75% off. It's like Christmas in the spring!

So I scooped up two flats of annual flowers, impatiens and petunias, for 75% off. You can't beat that, right?

So why are they still waiting in their tiny little cell packs to be planted in my garden?

Because we aren't past the danger zone yet when it comes to temperature. That's right, the F-word: frost. Freeze. Frigid. Call it what you like, but there is still a danger of frost. Frost kills impatiens quickly, and nips petunias, although they can withstand a little chill.

I'm not taking any risks, so my treasures are waiting to be planted until around May 1. Our "frost free" date is anywhere from April 20 to May 15, depending on exactly where you live in the Piedmont region. From experience, I can say for sure that some years it is on the early side, some years on the later side, but in all cases, we are still in the "danger zone" when the flowers tempt us but the temperatures fool us.


The garden centers stock the flowers now so that you have great choices. If you do find a bargain as I did, or you simply can't resist stocking up, then do keep your plants in their pots for now. I whisk mine back into the warmth of the garage on these cold nights and return them to the warm, sunny front walk slates during the day. It's the best of both worlds for an impatien, and until I can be sure of constant warmth and sunshine for my treasures, they will remain as you see them here.

Some tender annuals that you should wait to plant include:

  • Impatiens
  • Coleus
  • Ageratum
  • Begonia
  • All of your warm-weather veggies like tomatoes, peppers, etc.
  • Most herbs, including basil.

Of course there are more plants on the list than this. But these are the most common ones, and those which I happened to spy on my trip to the garden center this week. If you're in doubt about whether you can plant something now, wait or look it up on the Virginia Cooperative Extension website.

Wait to plant most tender annuals. You'll be glad you did!

Friday, April 1, 2016

Can I Plant Vegetables Now?

The answer to the question, "Can I plant vegetables now?" depends on the vegetables you want to grow. The cooler spring temperatures often give way to 70+ degree days, which can fool you into thinking that spring is here to stay. Not in south central Virginia. Nature blows hot, cold, and everywhere in between in spring, and temperatures can rapidly drop below freezing again, killing all those tender flowers and vegetables you worked so hard to grow.

Lettuce and cool weather greens can be planted outside now.


So what's a gardener to do? The Virginia Cooperative Extension has created a wonderful Vegetable Planting Guide that you can use as a guide as to when to plant most vegetables. There's a chart you can customize and even information on which veggies grow best from seeds sowed directly into the garden and which are best grown as transplants. Check out the link above!

If you did make a mistake and plant those tender vegetables and flowers now and a frost looms, remember that you can cover them with cloth blankets, cardboard or newspaper overnight. Cloches, or little hot houses made from clean, empty soda or milk bottles, can also be placed over individual plants.

Garden centers often stock plants at this time of year that you really shouldn't place in the ground quite yet. They want to entice gardeners to spend more and to shop early and often. If you buy them now just to get your favorite varieties before they're sold out, you can keep them in pots or containers outside on a patio or deck. That way if a frost threatens, you can whisk them inside overnight to keep them safe and warm. Just remember to keep them well-watered or else you'll be making another trip to the garden center to replace them!

Friday, March 18, 2016

Protecting Plants from Frost


These past few weeks have brought us plentiful sunshine and unseasonably warm temperatures here in Central Virginia. I don't know about you, but I've been outside gardening! Cleaning out the perennial beds, getting a head start on the weeds, planting up the window boxes with cool season annual flowers...spring is definitely in the air.

Then along comes Mother Nature with...what? Snow showers? 39 degree temperatures and rain/snow in the forecast?

Welcome to spring in Central Virginia, where March can roar in like a lion, gambol about like a lamb, roar a bit more, then settle down into lamb-like softness.

For gardeners, the thought of another bout of snow, ice and cold temperatures can send us into a complete panic. What about the daffodils? The pansies? The lettuce?

Relax. For the most part, if you've followed the guidelines for our region and planted only cool-season or early spring annuals and vegetables, you're safe. If you feel you want to protect your plants a little bit more, here's what you can do:


  • Before the storm or cold temperatures arrive, pull mulch back over newly emerging perennials that you think may be in danger from cold, frost or snow. 
  • Cover tender plants with a cloth blanket, a sheet or newspaper. Do not use plastic. Plastic transfers cold rather than keeps it away from plants.
  • Bring any pots or containers you can carry indoors for the day. One day in your garage or shed won't harm them.
Flowers such as daffodils and crocus can withstand a day of cold temperatures without problems. You may lose some flowers if it truly dips below freezing. You can cut the flowers and enjoy them indoors. Any newly emerging buds should be fine and the leaves will be fine. Pansies can withstand a day of chill just fine, and will spring back within a day or two as long as the temperatures rise above freezing after the initial storm has passed.


Friday, March 4, 2016

Upcoming Events for Gardeners in Prince Edward, Virginia


Local gardeners, take note: we've got some great events coming up for Prince Edward (and local) gardeners!

On March 14, 2016, the "Grow Your Own" series sponsored by the Virginia Cooperative Extension kicks off. From 5 to 7 p.m., experts will share tips on organic gardening and growing your favorite plants. This is a gardening series, with monthly gardening lectures all the way through November. There's a $5 fee or for $30, you can gain access to the entire series. For more information, please contact the Prince Edward Extension office at 434-392-4246.

The Heart of Virginia Master Gardeners offers many education programs throughout the year. Stay tuned for more great programs coming up this spring. Happy gardening!


Monday, February 22, 2016

Get Ready for the Hummingbird Migration!

Extension Master Gardeners shared a great post with a map on Facebook today sharing the hummingbird migration routes. Here in south central Virginia, we can expect our little feathered friends to return to the area sometime around April 10th. That date isn't set in stone, however. Depending on the weather and I assume the birds themselves, the migration may be a little later or earlier.

Coming soon to a garden near you!


Why do hummingbirds migrate? Hummingbirds sip nectar from flowers and yes, hummingbird feeders, to fuel their incredibly high metabolisms.

Here are a few facts gardeners might like to know about hummingbirds:


  • Hummingbirds sip nectar from flowers, tree sap, and ingest tiny insects caught in nectar and sap.
  • Their wings beat 80 times a minute. Because of their rapid heartbeat and other factors, they eat a very high sugar diet, and eat frequently, to get enough calories to survive.
  • They can eat at a rate of 13 licks per second!
  • A hummingbird's nest is the size of a walnut.
  • Hummingbirds hover in place by moving their wings in a figure-8 patterns.

Plant Flowers to Support Hummingbird Migration
Planting flowers, shrubs and trees to help hummingbirds through their migration period as well as during breeding season and beyond is a great idea. Purdue's Cooperative Extension offers a free, downloadable fact sheet on how to attract and nurture hummingbirds in the garden.

You can plant several different species in your garden to help the hummingbirds. You don't have to create a special hummingbird garden. Simply work in a few shrubs and perennials among your existing plants to offer hummingbirds an enticement to stop and socialize.

Trees that appeal to hummingbirds include the Tulip Poplar, Ohio Buckeye and Horsechestnut trees.

Common rhododendron (purple) and azalea (white) attract hummingbirds.


Shrubs to attract hummingbirds:
  • Rhododendron spp. (Common Rhododendron and Azaleas)
  • Hibiscus moscheustos (Rose Mallow)
  • Clethra spp. (Pepperbush)
Columbine attracts hummingbirds.


Perennials to attract hummingbirds include:
  • Aquilegia canadensis (Columbine)
  • Phlox spp. (Phlox)
  • Monarda spp. (Bergamot, Bee-Balm)
  • Lobelia cardinalas (Cardinal flower)

Vines:
  • Campis radicans (Trumpet Creeper)
  • Passiflora spp. (Passionflower)


Nectar bird feeders are, of course, a fun way to easily feed hummingbirds. But when you add plants to your garden to help hummingbirds, you also help other pollinators such as butterflies, bees and many other insects.

So here's to the return of spring...and the return of hummingbirds to the area. It's coming soon and spring is just around the corner!


Monday, February 15, 2016

Don't Forget the Birds in Your Garden!


Make sure to include bird feeding and bird watching in your list of wintertime gardening activities. It's a myth that if you start feeding the birds in your backyard, you'll make them dependent on humans for food.

During the mid to late winter, natural food sources dwindle. Birds must work harder and fly longer to find sources of food. That's why backyard bird feeding helps local bird populations. It provides food at a time of year when birds really need a helping hand.

A few tips from the University of Maine's Cooperative Extension website regarding feeding backyard birds...


  • Choose different types of feeders if you plan to hang more than one. Tray feeders, like the one above, are great for birds who peck their seed from the ground. Tube feeders provide perches for smaller birds like finches and sparrows to find seed. Suet block feeders support insect-eaters like woodpeckers and flickers. A variety of feeders will help the most birds, but even one feeder is appreciated.
  • Keep feeders clean. Make sure to scrub them thoroughly before you put them away for the season. A mild bleach and water solution can be used to disinfect them.
  • Add a variety of seeds to tube and other seed feeders. Black oil sunflower seeds appeal to many species of birds. A songbird mix provides a wide variety of seeds.
  • Grow your own! Next year, add a row of sunflowers to your garden. The seeds are enjoyed during the blooming season but you can also dry the seeds to add to feeders during the winter. You can even dry the flower heads on the stalk, then hang them upside down from the stem in a tree to feed birds.
  • Keep squirrels from feeders by hanging feeders on a thin wire between two trees. Squirrels can jump up to 20 feet, but a thin wire makes it difficult for them to reach a feeder. Squirrel baffles, or plastic shelves above and below the feeder, can also challenge squirrels and deter them from enjoying a banquet at your feeder.
  • Place meal worms out for those birds who need an insect treat now and again. You can just place them on a tray for the birds.
  • Make your own feeder. Take a stale bagel, smear it with peanut butter, press it into seeds and hang it with a cord from a tree. Instant bird and yes, squirrel feeder.

These and other backyard birding tips may be found on the University of Maine Cooperative Extension website.

Thursday, January 14, 2016

Seed Starting Tips

It's that time of year when the mail brings catalog after catalog of seeds, plants, and gardening tools. It's time to dream about the perfect garden, and to do a little planning to ensure you've got exactly the varieties you'd like in your garden. One great way to do this is to grow plants directly from seeds. If you're starting your garden from seeds and plan to grow seeds indoors, these tips may help you create a flourishing garden.


10 Seed Starting Tips

  1. Plan your garden out on paper so that you know what you'd like to plant and where you will plant it before purchasing seeds. It's tempting to buy too many seeds during winter when you're yearning to get outside and garden.
  2. Decide which plants are more economical to buy from your local garden center and which are best started from seeds. If you need just one plant, for example, it may be better to buy a single plant at your favorite nursery than purchasing seeds.
  3. Stock up on seeds you will use throughout the growing season. This includes lettuce, which may be planted in the spring as well as in the fall, and other seeds that may be difficult to find in the summer months.
  4. Check your grow lights or seed starting lights if you're starting seeds indoors. Replace burned-out bulbs and clean the unit.
  5. Purchase a timer so that your seed starting lights go on and off automatically. This way, you'll never forget to turn on the lights!
  6. Sterilize all of your seed starting equipment before planting seeds. You can sterilize plastic pots, trays and containers using a solutions of 9 parts water to 1 part household bleach. Mix the solution and soak the plastic containers for 10 minutes. Rinse, dry, and use.
  7. Heat is important for germination of many common flowers and vegetables. Check the back of the seed package to see what the preferred temperature is for germination. Purchase and use ONLY specially made seed-starting heat mats. These are intended to be used under seed starting trays. Don't try to make them yourself - you could start a fire.
  8. Read the back of the seed package to determine when to plant seeds indoors. The back of the seed package provides plenty of information include how to plant the seeds, days to germination, and more.
  9. Make labels for your pots or containers from clean popsicle sticks, cut up slats of old Venetian blinds, or any strips of wood or plastic you'd like to recycle.
  10. Test seed viability for any opened seed packages you may have stored from previous years. Place 10 seeds between moist paper towels in a sealed plastic bag. Place the bag in a warm location such as on top of your refrigerator and wait a week. Check daily. The number that germinates gives you the percent of viable seeds in an open seed package. This gives you a good idea if you need to buy more or not this year.

Happy gardening!